公共事件
15.2:公共事件
15.2.1:场景介绍
当应用在运行状态时对某个公共事件进行订阅,在运行期间如果有订阅的事件发布那么订阅了这个事件的应用将会收到该事件及其传递的参数。
OpenHarmony 系统提供了诸多系统事件,像屏幕的息屏、亮屏事件,USB 的插拔事件,以及 APP 的安装、卸载等事件。鉴于这些事件是由系统发出的,那么在诸如设备电量低需要向用户提示充电这类场景下,若要对这些系统事件进行监听,又该如何操作呢?
ArkUI 开发框架贴心地为我们准备了@kit.BasicServicesKit模块。这一模块功能强大,它既能够实现对系统事件的订阅,又具备订阅和发布自定义事件的能力。在本节内容中,笔者将会对该库相关 API 的使用方法做一个简要介绍。
订阅部分系统公共事件需要先申请权限,订阅这些事件所需要的权限请见公共事件权限列表。
15.2.2: 接口说明
| 接口名 | 接口描述 |
|---|---|
| createSubscriber(subscribeInfo: CommonEventSubscribeInfo, callback: AsyncCallback): void | 创建订阅者对象(callback)。 |
| createSubscriber(subscribeInfo: CommonEventSubscribeInfo): Promise | 创建订阅者对象(promise)。 |
| subscribe(subscriber: CommonEventSubscriber, callback: AsyncCallback): void | 订阅公共事件。 |
| unsubscribe(subscriber: CommonEventSubscriber, callback?: AsyncCallback): void | 取消订阅公共事件。 |
| publish(event: string, callback: AsyncCallback): void | 发布公共事件。 |
| publish(event: string, options: CommonEventPublishData, callback: AsyncCallback): void | 指定发布信息并发布公共事件。 |
| publishAsUser(event: string, userId: number, callback: AsyncCallback): void | 发送指定用户的公共事件。 |
| publishAsUser(event: string, userId: number, options: CommonEventPublishData, callback: AsyncCallback): void | 发送指定用户的指定发布信息并发布公共事件。 |
15.2.3:commonEventManager订阅事件
1.引入commonEventManager模块
import { commonEventManager } from '@kit.BasicServicesKit'
2.创建订阅者
commonEventManager.createSubscriber({
  events: ["testEvent"]// 接收的指定事件名称,可以为多个事件
}, (error: BusinessError, subscriber: commonEventManager.CommonEventSubscriber) => {
  if(err) {
    // 订阅异常的逻辑处理
  } else {
    // subscriber供后续订阅做准备
  }
})
3.开启事件订阅
// 通过创建的subscriber开启事件订阅
commonEventManager.subscribe(subscriber, (err: BusinessError, data: commonEventManager.CommonEventData) => {
  if(err) {
    // 错误逻辑处理
  } else {
    // 接收到事件,开始处理
  }
})
15.2.4:commonEventManager发布事件
@kit.BasicServicesKit 模块提供了两个方法发布事件,一个是不带参数的事件,另一个是可以带有额外参数的事件,如下所示:
1.发布无参数事件
commonEventManager.publish("testEvent", (err: BusinessError) => { // testEvent表示发布的事件名称
  if(err) {
    // 事件发布失败
  } else {
    // 事件发布成功
  }
})
2.发布有参数事件
commonEventManager.publish("testEvent", {// testEvent表示发布的事件名称
  code: 10086,
  data: "publish with data"
}, (err: BusinessError) => {
  if(err) {
    this.publish = "publish event error: " + err.code + ", " + err.message + ", " + err.name + ", " + err.stack;
  } else {
    this.publish = "publish event success";
  }
})
以上就是事件的订阅和发布用法,接下来我们举一个简单示例演示一下:
import { BusinessError, commonEventManager } from '@kit.BasicServicesKit';

@Entry
@Component
struct Index {
   @State text: string = "";
   @State publish: string = "";
   private subscriber?: commonEventManager.CommonEventSubscriber | null = null;

   private createSubscriber() {
      if (this.subscriber) {
         this.text = "subscriber already created";
      } else {
         commonEventManager.createSubscriber({
            // 创建订阅者
            events: ["testEvent"]                   // 指定订阅的事件名称
         }, (error: BusinessError, subscriber: commonEventManager.CommonEventSubscriber) => {
            if (error) {
               this.text = "create subscriber failure"
            } else {
               this.subscriber = subscriber; // 创建订阅成功
               this.text = "create subscriber success";
            }
         })
      }
   }

   private subscribe() {
      if (this.subscriber) {
         // 根据创建的subscriber开始订阅事件
         commonEventManager.subscribe(this.subscriber, (err: BusinessError, data: commonEventManager.CommonEventData) => {
            if (err) {
               // 异常处理
               this.text = "subscribe event failure: " + JSON.stringify(err)
            } else {
               // 接收到事件
               this.text = "subscribe event success: " + JSON.stringify(data)
            }
         })
         this.text = "subscriber common event success";
      } else {
         this.text = "please create subscriber";
      }
   }

   private unsubscribe() {
      if (this.subscriber) {
         commonEventManager.unsubscribe(this.subscriber, (err: BusinessError) => { // 取消订阅事件
            if (err) {
               this.text = "unsubscribe event failure: " + JSON.stringify(err)
            } else {
               this.subscriber = null;
               this.text = "unsubscribe event success: ";
            }
         })
      } else {
         this.text = "already subscribed";
      }
   }

   private publishEvent() {
      commonEventManager.publish("testEvent", (err: BusinessError) => { // 发布事件,事件名称为testEvent
         if (err) { // 结果回调
            this.publish = "publish event error: " + JSON.stringify(err)
         } else {
            this.publish = "publish event success";
         }
      })
   }

   private publishEventWithData() {
      commonEventManager.publish("testEvent", {
         // 发布事件,事件名称为testEvent
         code: 10086, // 事件携带的参数
         data: "publish with data"                       // 事件携带的参数
      }, (err: BusinessError) => { // 结果回调
         if (err) {
            this.publish = "publish event error: " + err.code + ", " + err.message + ", " + err.name + ", " + err.stack;
         } else {
            this.publish = "publish event with data success";
         }
      })
   }

   build() {
      Column({ space: 10 }) {
         Button("创建订阅者")
            .size({ width: 260, height: 50 })
            .onClick(() => {
               this.createSubscriber();
            })
         Button("订阅公共事件")
            .size({ width: 260, height: 50 })
            .onClick(() => {
               this.subscribe();
            })
         Button("取消订阅")
            .size({ width: 260, height: 50 })
            .onClick(() => {
               this.unsubscribe();
            })
         Text(this.text)
            .size({ width: 260, height: 150 })
            .fontSize(22)
            .backgroundColor("#dbdbdb")
         Divider()
            .size({ width: 260, height: 5 })
         Button("发布公共事件")
            .size({ width: 260, height: 50 })
            .onClick(() => {
               this.publishEvent();
            })
         Button("发布公共事件指定公共信息")
            .size({ width: 260, height: 50 })
            .onClick(() => {
               this.publishEventWithData();
            })
         Text(this.publish)
            .size({ width: 260, height: 150 })
            .fontSize(22)
            .backgroundColor("#dbdbdb")
      }
      .padding(10)
         .size({ width: "100%", height: '100%' })
   }
}
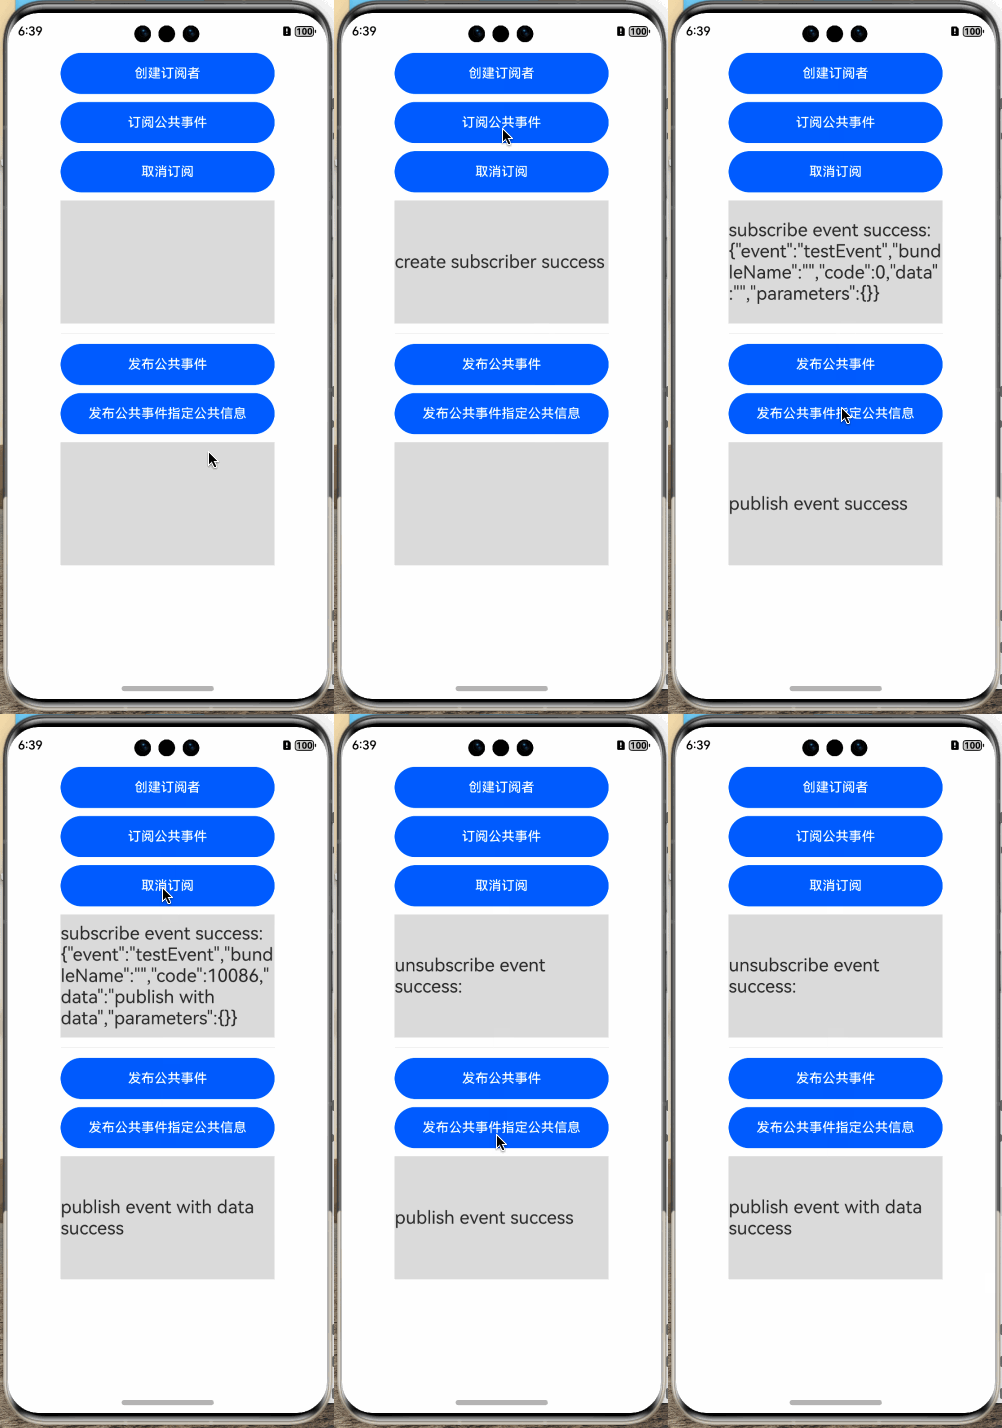
样例很简单,首先创建一个订阅者,然后订阅指定事件,当有匹配的事件时,会回调给订阅者,运行结果如下图所示:

样例简单演示了发送自定义事件的操作, @ohos.commonEvent 模块下的 Support 类内定义了许多系统事件,订阅系统事件只需要把自定义的事件名称替换成 Support 内部支持的事件名称即可。
15.2.5:小结
本节简单介绍了事件的订阅和发布, @ohos.commonEventManager 模块不仅可以订阅系统事件,还可以订阅和发布自定义事件,最后请读者思考一下:根据前边章节讲述的ArkUI的状态管理,比如跨页面数据更新可不可以使用事件订阅机制来实现?
备注
作者:灰太狼,童长老
來源:坚果派
著作权归作者所有。商业转载请联系作者获得授权,非商业转载请注明出处。否则追究相关责任。
